If you ride a motorcycle in India, you know that our roads can be tough. Dust, potholes, and heavy traffic put a lot of stress on your bike’s parts. One of the most ignored but important parts is the motorcycle chain.
Have you heard a “kat-kat” noise from the rear wheel? Or does your bike feel jerky when you accelerate? This usually means your chain is loose. A loose chain is not just annoying; it is dangerous. It can slip off the sprocket and cause an accident. It also reduces your bike’s mileage.
The good news is that you don’t always need to visit a mechanic. Adjusting the chain slack (tightness) is a simple skill you can learn at home. This guide will explain how to check and adjust your motorcycle chain safely.
Signs Your Chain Needs Adjustment
Before you pick up your tools, you need to be sure the chain is actually the problem. Look for these signs:
- Noise: You hear a slapping or clanking sound from the left side of the rear wheel.
- Jerky Ride: The bike feels rough when you speed up or slow down.
- Visible Hanging: When the bike is on the side stand, the chain looks like it is hanging too low.
- Sprocket Wear: The teeth on the gears (sprockets) look sharp or hooked, which happens when a loose chain rubs against them wrongly.
Tools You Will Need
You only need a few basic tools to do this job. Most bikes in India (like Hero Splendor, Bajaj Pulsar, or TVS Apache) come with a toolkit that has exactly what you need.
- Ring Spanners: usually size 22mm, 24mm, or 17mm (for the main axle nut).
- Small Spanners: usually size 10mm, 12mm, or 14mm (for the adjuster nuts).
- A Ruler or Tape Measure: to check the gap.
- A Rag/Cloth: to clean your hands.
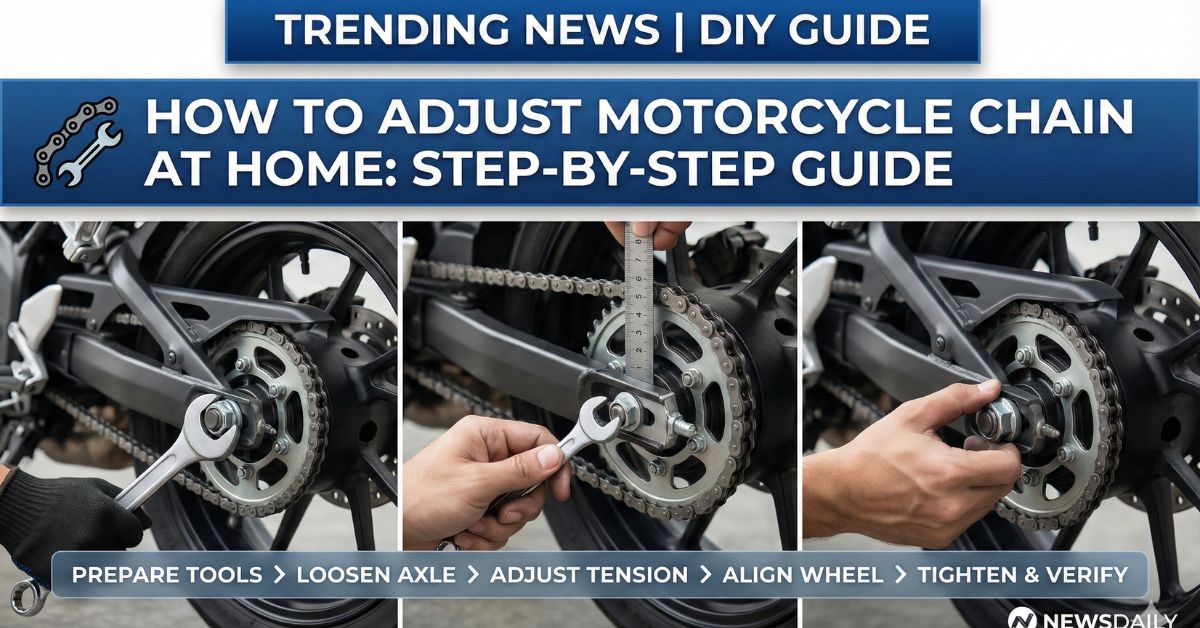
Step-by-Step: How to Tighten Your Motorcycle Chain
Step 1: Position the Bike Park your motorcycle on a flat surface. Put it on the center stand. This allows the rear wheel to rotate freely. If your bike only has a side stand, you can still do it, but using a center stand is much more accurate.
Step 2: Check the Current Slack “Slack” is the amount the chain can move up and down.
- Find the middle point of the chain (between the front and rear gears).
- Use your finger to push the chain up and then pull it down.
- Measure this movement. For most Indian commuter and sports bikes, this gap should be between 25mm and 30mm (about 1 to 1.2 inches).
- Check your bike’s owner manual or the sticker on the swingarm (the metal bar holding the rear wheel) for the exact number.
Step 3: Loosen the Rear Axle You do not need to remove the wheel! Just take your large spanner and loosen the big nut on the rear axle (the rod holding the wheel). You only need to loosen it enough so the wheel can move slightly—do not take the nut off completely.
Step 4: Adjust the Chain Look at the end of the swingarm near the wheel. You will see small “adjuster nuts” on both the left and right sides.
- Use your small spanner to turn these nuts.
- Turn Clockwise (Right): This pulls the wheel back and tightens the chain.
- Turn Anti-Clockwise (Left): This pushes the wheel forward and loosens the chain.
- Crucial Rule: If you turn the left nut one full circle, you must turn the right nut exactly the same amount. Both sides must be equal. If they are not equal, your wheel will be crooked, which is dangerous.
Step 5: Check Alignment and Re-Tighten Most bikes have small lines or markings on the swingarm to help you align the wheel. Ensure the markings are at the exact same position on both the left and right sides. Once the chain tension feels correct (remember the 25-30mm gap), tighten the big rear axle nut securely.
Step 6: Final Check Rotate the wheel by hand. It should spin freely without getting stuck. Re-check the slack with your ruler one last time. Sometimes, tightening the big nut makes the chain a little tighter, so you might need to readjust slightly.
Why Proper Maintenance Matters
Many riders ignore their chain until it breaks. Maintaining the correct tension helps you in three ways:
- Safety: A chain that is too loose can jump off while you are riding fast, locking the rear wheel.
- Mileage: A well-adjusted chain transfers power smoothly from the engine to the wheel. A bad chain wastes power and burns more petrol.
- Long Life: Chains and sprockets are expensive to replace (often ₹1,500 to ₹3,000 depending on the bike). Keeping them adjusted makes them last twice as long.
Common Mistakes to Avoid
- Too Tight is Bad: Do not tighten the chain like a guitar string. A chain that is too tight puts huge pressure on the engine and gearbox bearings. It can snap under heavy load (like when you have a pillion rider).
- Ignoring Lubrication: Tightening a dry, rusty chain is useless. Always clean and lube your chain after adjusting it.
- Uneven Adjustment: Always double-check that the left and right side markings on the wheel are identical.
Read More : Electric Car Charging Problems in India
Frequently Asked Questions (FAQs)
Q1: How often should I check my bike chain?
You should check the chain slack every 500 to 800 kilometers. If you ride on dusty or muddy roads often, check it every 500 km.
Q2: How much does a mechanic charge for chain adjustment?
In India, a local mechanic usually charges between ₹50 to ₹100 for cleaning, lubricating, and tightening the chain.
Q3: Can I use old engine oil to lube my chain?
It is better to use proper Chain Lube or Gear Oil (SAE 90). Old engine oil is full of metal dust and dirt from the engine, which can damage the chain.
Q4: My chain makes noise even after tightening. Why?
If the chain is clean and tight but still noisy, it might be worn out. Chains stretch over time. If it has stretched too much, no amount of tightening will fix it. You will need to replace the chain and sprocket set.
Q5: What is the correct slack for a Royal Enfield Bullet?
Heavier bikes like the Classic 350 often need slightly different slack (usually 25-30mm). Always check the user manual for your specific model.